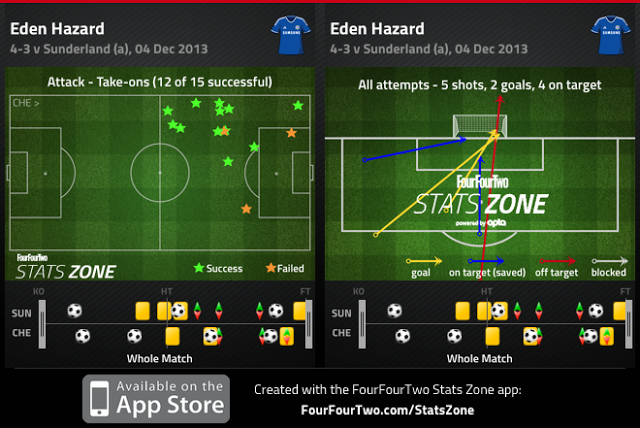
Chelsea rode a world class performance from Eden Hazard to a 4-3 win over Sunderland at the Stadium of Light. This was a highly entertaining but strange contest. That it produced 7 goals is more a reflection of Hazard's individual class and some poor defending from both sides than of a frantic end to end game. The 7 total goals game from just 8 total shots on target.
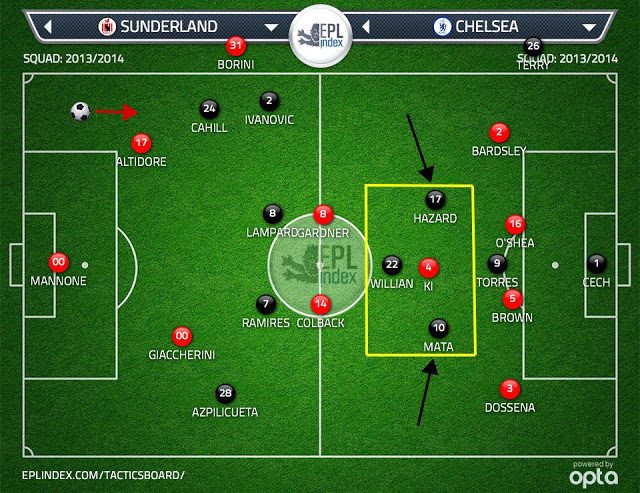
Jose Mourinho set Chelsea out in a 4-2-3-1 with Ramires and Lampard anchoring midfield. Hazard was on the left of the attacking midfield three while Willian and Juan Mata rotated between the right side and the #10 spot. Cesar Azpilicueta was again given the nod over Ashley Cole at left back.
Gus Poyet opted for a 4-3-3. Ki sat just in front of the back four in midfield while Jack Colback and Craig Gardner played the midfield shuttling roles. Fabio Borini was on the left side of the front three, Emanuele Giaccherini was on the right and Jozy Altidore was given the nod as the lone striker.
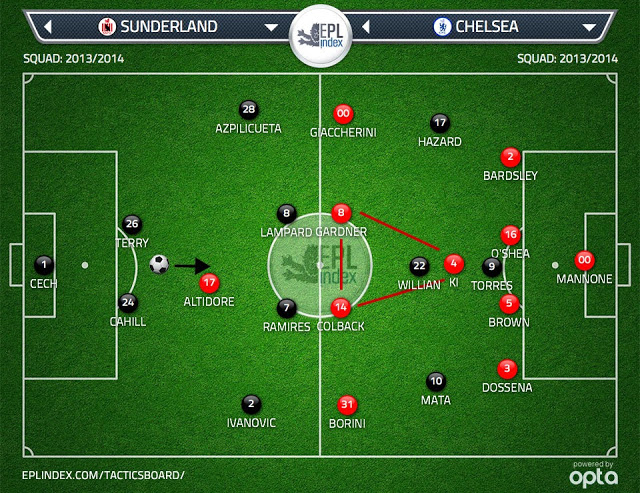
The 4-2-3-1 vs. 4-3-3 matchup meant that each side's center midfielders had a direct opponent. Gardner was matched up against Lampard, Colback against Ramires and Ki against Mata or Willian depending on who was playing as the center attacking midfielder at the time. Both sides stuck to these matchups defensively. When Chelsea were in possession Gardner and Colback stepped out to press Lampard and Ramires respectively while Ki sat in behind picking up the attacking center midfielder, giving Sunderland a 4-1-4-1 defensive shape.
 |
| Sunderland defend 4-1-4-1 |
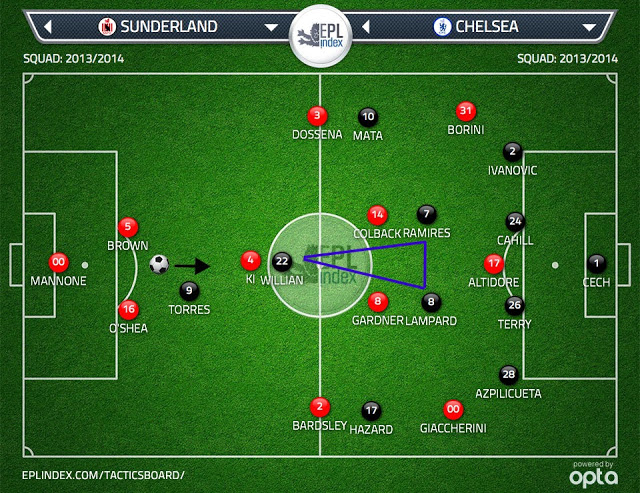
Defensively, the triangle was flipped for Chelsea so that their shape off the ball was 4-4-1-1. Ramires and Lampard picked up the more advanced Colback and Gardner while Willian stayed tight to the deeper lying Ki.
 |
| Chelsea defend 4-4-1-1. |
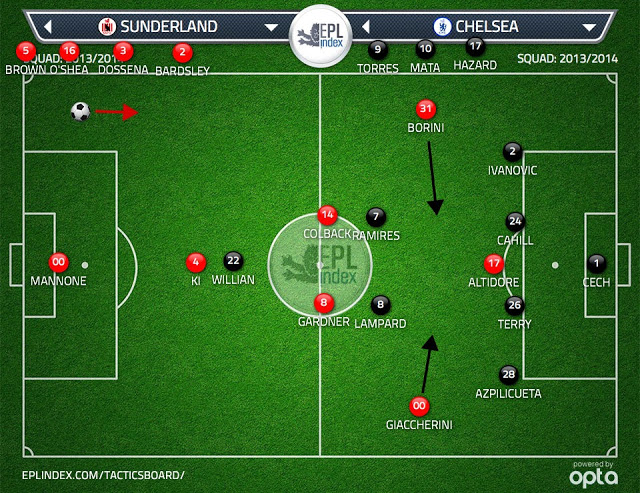
The formations meant neither side had a spare holding midfielder. Ki was 1 v. 1 with Willian, Lampard and Ramires were 2 v. 2 with Gardner and Colback. With both sets of holding midfielders occupied marking an opponent, this opened up space for both teams' wide attacking players to tuck inside in the space between the outside backs and the holding midfielders. The figure below shows the danger areas where Borini and Giaccherini could drift into to find space in front of Chelsea's back four. By drifting into these areas, they forced Chelsea's outside backs into a difficult decision. If Ivanovic and Azpilicueta allowed them to drift in field unmarked, they'd have space to receive the ball in an incredibly dangerous area between Chelsea's defensive lines. If instead Ivanovic and Azpilicueta followed them in to the center of the pitch, it opened up space down the flank for overlapping runs from Sunderland's own outside backs.
 |
| Space between the lines for Sunderland wide forwards. |
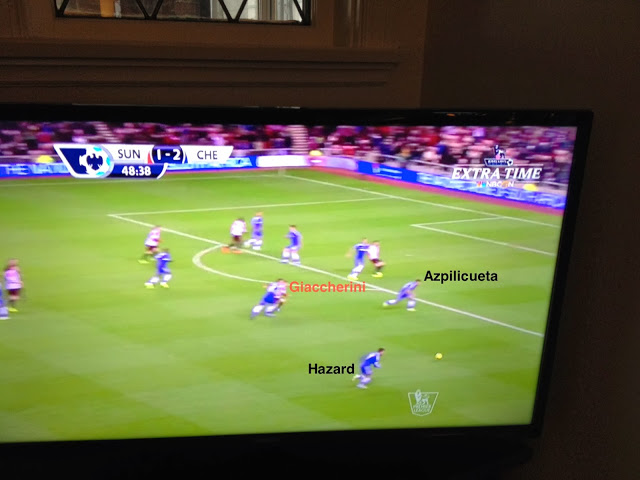
Sunderland's goal to make it 2-2 was a great example of Azpilicueta being forced into making the latter decision. Giaccherini drifted in to a dangerous position in field between the defensive lines and Azpilicueta was dragged inside to mark him. Bardsley made an overlapping run down the wing into the now vacant space forcing Hazard into a tackle that went out of play for a corner Sunderland would subsequently score from. Below is a screen grab of the build up leading to the corner.
 |
| Build up to Sunderland's second goal. |
Similarly, Sunderland's lack of a spare holding midfielder created opportunities for Chelsea's wide men to be dangerous drifting from the channels into more narrow positions. With Ki matched up directly with Willian, Hazard and Mata could drift inside to create 1 v. 3 overloads on Ki as shown in the graphic below.
 |
| Chelsea look to overload key. |
The key then for Sunderland was to keep their midfield triangle and the two center backs very compact so that the space in the middle of the pitch was too congested for Chelsea to be dangerous. They did a decent job of this task. Aside from Chelsea's goal that stemmed from a corner, the visitors managed 5 other shots, none of which were on target and 4 of which were speculative efforts outside the 18.
With Sunderland doing well to keep the space compact through the middle, Hazard made a subtle change to his positioning. Rather than tucking inside to receive the ball, he stayed in wide areas and looked to take on Bardsley and dribble in field when he got the ball in the channels and shoot with his stronger right foot. This was the key tactical feature of the game. Again, the fact Sunderland did not have a spare holding midfielder was important. Because Ki had his own man marking responsibility he could not slide over to the right to offer Bardsley support when Hazard began making his move inside. Twice Hazard scored by running past Bardsley inside and getting the space to take on a shot. For the first goal he was able to beat the Sunderland right back with the dribble, for the second he performed a 1-2 with Lampard.

The other key feature of the contest was Chelsea's surprising inability to clear their lines from set pieces. All three of Sunderland's goals stemmed from dead ball scenarios. Altidore's opener came when the Blues failed to clear a Dossena free kick. More troubling, the Black Cats second and third goals resulted when Chelsea allowed cornersto bounce inside of 12 yards.
